Adding an Alarm Area
Alarm Areas is where you define the source of an alarm. Alarm Areas are created under Hyper Alarm Server Alarms node. You define the alarm area, add the alarm information, and then specify its alarm type (Digital, Limit, Hi, Lo, etc.). Based on the alarm type selected, the appropriate alarm behaviors are presented.
For example, the Water Tank capacity is measured. You add an alarm area called Water Tank. You then add an alarm tag called Tank Level—this alarm is where you specify the alarm type and its associated input parameters on the alarm.
To add an alarm area:
- From the Workbench Project Explorer, click Alarms and Notification and then expand Hyper Alarm Server.
- Right-click on Alarms node and select Add Alarm Area.
 Using the example above, the following steps add an alarm area called 'Water Tank'.
  View image
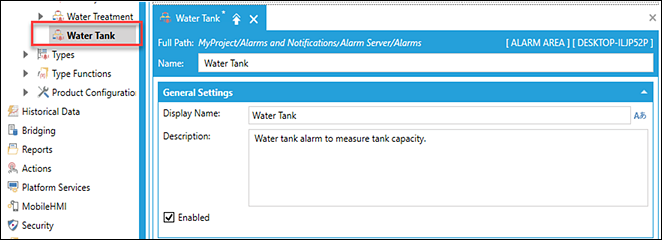
- In the Name text box, type 'Water Tank' and then enter the following information:
- (Optional) Display Name: This is the name you want to display in the alarms hierarchy.
- (Optional) Description: Self-explanatory. Type a description of the alarm function.
- Keep the Enabled checkbox selected. If you clear the checkbox,
- Click Apply.
To add an alarm to the alarm area:
- Right-click on Water Tank and select Add Alarm.
- In the Name text box, type Tank Level.
- (Optional) Type the alarm Display Name and Description.
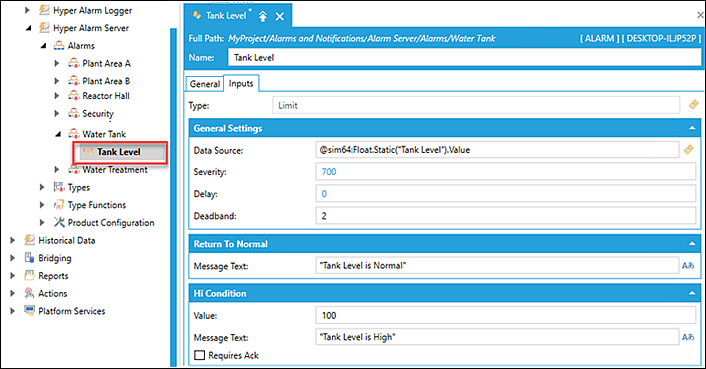
- Select the Inputs tab to define the alarm type. View Image
- Type: Click the tag
 and select Limit. This selection uses the characteristics of the predefined alarm type.
 - Data Source: @sim64:Float.Static("Tank Level").Value
- Severity: (default as 700). Alarm severity levels can range from 1 - 1000, where 1 could be the lowest priority and 1000 the highest priority.
- Delay(seconds): Default is 0 (no alarm delay). Whereas a 7 delays reporting the alarm for 7 seconds. A delay may offset a faulty reading or return to normal within the delay period.
- Deadband: Default is 0. For example, a limit alarm with a Hi limit of 100 and a deadband value of 2 enters the alarm state as soon as it passes 100, and it must drop below 98 to return to normal.
- Type: Click the tag
- In the Return to Normal section, the Message Text is "Tank Level is Normal".
- In the Hi Condition section, enter the following:
- Value: 100
- Message Text: "Tank Level is High"
- Requires Ack: When the checkbox is selected, the alarm requires operator acknowlegement.
-
Click Apply.